
Streamer Starter guide 2026
A complete roadmap for PC Streaming (Twitch, YouTube, Kick) for beginning streamers. Looking for the TikTok Live guide? Coming soon!
Meet Your Guide: The Friendly Neighborhood Bard
Hello!! My name is Musicman, and I am your Friendly Neighborhood Bard.
I have been streaming on Twitch for over 5 years. Now, full disclosure: I am not a "huge" streamer. I have just over 600 followers on my channel (twitch.tv/neighborhoodofmusic), but I have seen a lot in the 5 years I have been going live.
I’m here to build an easy-to-follow guide to setting up your first stream. When you are just starting out, the tech and the terminology can feel completely overwhelming. My goal is to break down those confusing topics and show you that you don't need to be an expert to get started.
Let’s get you live.
Part 1: The Amazon Wishlist Trap
If you’re thinking about starting a stream, I can guess what your browser history looks like right now. You’re looking at the Shure SM7B microphone. You’re comparing Elgato Key Lights. You have a cart full of RGB accessories that totals over $1,000.
I want you to close that tab.
The biggest lie in content creation is that you need "Pro Gear" to be a "Pro Streamer." The top streamers you watch today didn’t start with that gear—they earned it.
If you are waiting to buy the perfect setup before you hit "Go Live," you aren't preparing; you’re procrastinating. Today, we are going to build your stream using things you already have in your house.
Rule #1: Audio is King (But It Doesn't Need to Be Expensive)
Here is the golden rule of streaming: Viewers will forgive pixelated video, but they will leave immediately if your audio is bad.
But "good audio" doesn't mean a $400 studio microphone. It means Proximity.
The difference between a "bad" microphone and a "good" one is often just how close it is to your face.
-
The Headset Hack: If you have a gaming headset, use it. The mic is designed to be close to your mouth. It works perfectly fine for your first 6 months.
-
The USB Hack: If you have a cheap Blue Snowball or a generic USB mic (I personally recommend starting out with a Fifine AM8 microphone https://fifinemicrophone.com/collections/usb-microphones/products/fifine-ampligame-am8-microphone), do not leave it on your desk 2 feet away from you. Put it on a stack of books. Get it within 6 inches of your mouth.
Turn off your ceiling fan. Close your window. If you do those two things, you will sound better than someone with a $500 mic in a noisy room.
Rule #2: You Already Own a $1,000 Camera
Do not buy a webcam. The standard Logitech C920 is fine, but you have something better in your pocket right now: Your Smartphone.
Modern phone cameras are incredibly powerful. There are free apps like VDO.Ninja (https://vdo.ninja), DroidCam (https://droidcam.app), or EpocCam (https://www.elgato.com/us/en/s/epoccam) that turn your phone into a wireless webcam.
-
Why it’s better: Your phone has better color depth and autofocus than almost any USB webcam under $200.
-
How to do it: Download the app, connect it to your PC via Wi-Fi or USB, and mount it. (Pro tip: Duct tape works if you don’t have a tripod yet).
Rule #3: Lighting for $0
New streamers always rush to buy expensive LED panels. You don't need them. You just need physics.
A harsh desk lamp pointed at your face will make you look washed out and sweaty. Instead, take that same desk lamp and point it at the white wall in front of you.
This "bounces" the light. The wall acts as a giant diffuser, turning a harsh bulb into a soft, professional light source that fills the room. It looks high-end, and it costs literally zero dollars.
The "Do NOT Buy" List
Save your wallet. Here are three things you are banned from buying until you have at least 100 followers:
-
A Stream Deck: You don’t need 15 LCD buttons to switch scenes. Use the Number Pad on your keyboard. It’s free.
-
A Green Screen: A green screen is actually harder to light properly than a messy bedroom. It creates weird halos around your head if not done perfectly. Just clean your room instead. There are software ways to remove your background, but that is later down the line.
-
A Capture Card: Unless you are streaming console games (Xbox/PS5) through a PC, you do not need this. If you are gaming on your PC, the software captures the game directly.
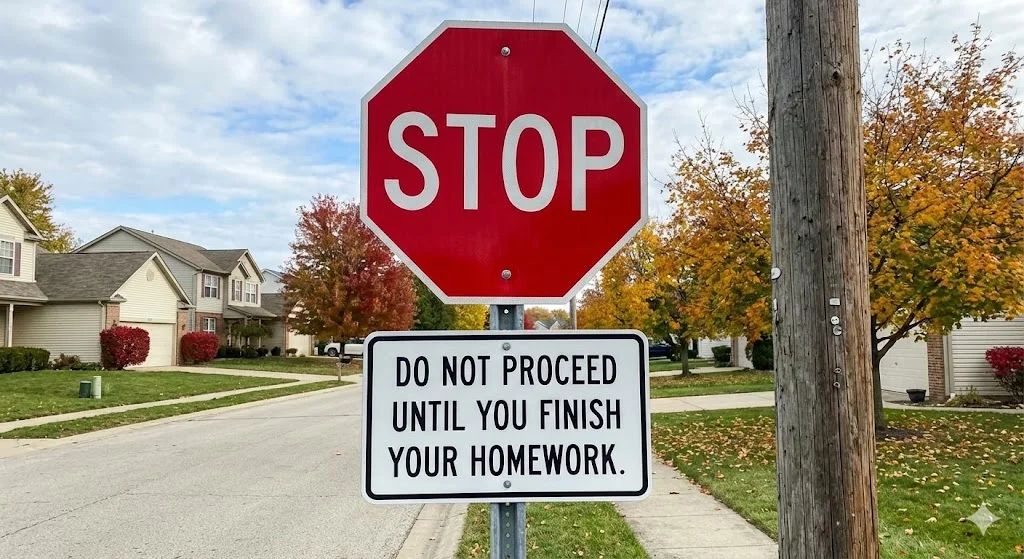
Your Homework
Stop researching and start setting up.
-
Clear your desk.
-
Stack books to raise your mic.
-
Point your lamp at the wall.
Once you have your gear pile ready, the next step is the software. In Part 2, I’ll show you why I stopped recommending OBS Studio to beginners and what you should use instead.

Part 2: Software
In Part 1, we gathered your gear. You have your headset, your phone-webcam, and a lamp pointed at the wall. You have the vehicle, but now you need the engine.
We need a way to send that video to the internet.
This is where most new streamers hit a wall. If you search "How to Stream" on YouTube, you will drown in tutorials about bitrates, keyframes, and encoders. You will see two names come up over and over again: OBS Studio and Streamlabs.
For years, those were your only real choices. But it is 2026, and I am going to recommend something different.
The Old Guard: Why We Are Skipping OBS and Streamlabs
To understand why I’m recommending a new tool, you need to understand the old ones.
- OBS Studio is the industry standard. It is powerful, open-source, and free. It is also the "Manual Transmission" of streaming. It gives you total control, but if you don't know what you are doing, you will stall out. The interface looks like an old spreadsheet, and doing simple things often requires installing third-party plugins.
- Streamlabs Desktop is the "Easy Mode." It looks nicer and holds your hand, but it comes at a cost. It is often bloated, constantly tries to upsell you on premium subscriptions, and eats up your computer's processing power—power that should be going to your game.

The New Challenger: Meld Studio
For this guide, I am recommending a newer piece of software called Meld Studio.
Why am I recommending Meld to beginners? Because it treats streaming like design software, not engineering software. It feels less like coding and more like using Canva or Photoshop.
Here is why it is the best starting point for a small streamer:
1. Layers vs. Scenes (The "Photoshop" Logic)
In older software like OBS, organizing your screen can get messy. You have to build complex "Scenes" and sometimes put scenes inside of other scenes just to group things together. It requires you to think abstractly.
Meld works exactly like Photoshop. You have Layers.
- Want your camera on top of your game? Drag the camera layer up in the list.
- Want your game on top? Drag it down.
- It is visual, intuitive, and just makes sense.
2. It Just Works
Meld is built for modern computers. It is lightweight, which means it won't slow down your game as much as the bloated alternatives. It also handles Multi-Streaming natively, meaning if you ever want to stream to Twitch and YouTube at the same time, you don't need to pay for a subscription service to do it.
(Note: As of writing this in late 2025, Meld Studio does NOT yet have native access to TikTok Live. For that, you will still need a stream key or TikTok Live Studio, which we will cover in a future guide.)
Your Homework
I want you to take action today. Do not worry about settings, bitrates, or making it look pretty yet. Just get the engine running.
- Download Meld Studio (it is free to start).
- Log in with your Twitch, YouTube, or Kick account.
- Add a Layer for your Microphone.
- Add a Layer for your Webcam (or phone camera).
Once you can see yourself on screen and the audio bar moves when you talk, stop. You are done for today.
In Part 3, we are going to tackle the thing that ruins more streams than anything else: The Audio Mix. I will teach you how to use the "Magic Mic" feature to sound like a pro instantly.

Part 3: Audio
In Part 1, we set up your hardware. In Part 2, we fired up the engine with Meld Studio. Now, we have to tackle the most critical part of your stream.
I said it in Part 1, but I will say it again: Viewers will watch a 720p stream, but they will not listen to a bad microphone.
If your audio crackles, echoes, or hurts their ears when you scream, they are gone.
The good news? You don't need a $400 microphone to sound professional. You just need to understand two things: The Magic Mic and The Red Zone.
1. The "Magic Mic" (One Click to Pro Audio)
The Problem: When you stop talking, your microphone is still listening. It hears your keyboard clicking, your computer fan whirring, and your mom vacuuming in the hallway.
The Solution: Meld Studio has a feature literally called Magic Mic.
It does two things at once:
- Noise Suppression: It uses AI to listen to your room and delete background noise (fans, keyboards) in real-time.
- Automatic Gain Control: It automatically adjusts your volume so you don't sound too quiet or too loud.
How to turn it on:
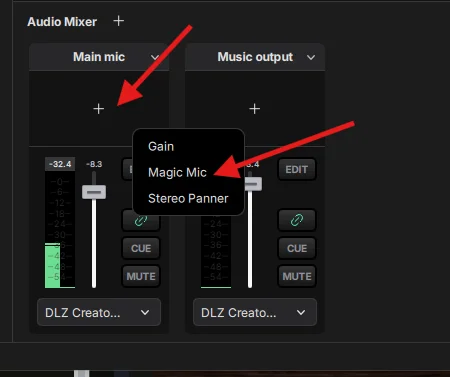
- Go to your Audio Mixer panel in Meld.
- Find your Microphone (it might be labeled "Main Mic").
- Click the + (Plus) icon in the audio effects rack.
- Select Magic Mic from the list.
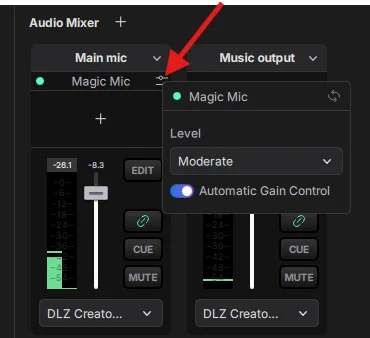
Fine Tuning:
- Click the Settings Icon (the gear) next to Magic Mic.
- Suppression Strength: Set this to "Moderate" or "High" depending on how loud your room is.
- Auto Gain: Make sure this is enabled. This helps keep your voice volume consistent without you needing to be an audio engineer.
2. The "Red Zone" Rule (Volume Discipline)
Even with Magic Mic helping you out, you need to practice Mic Discipline.
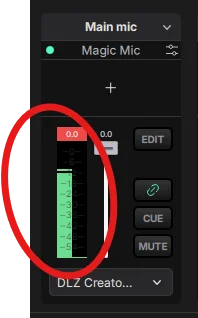
Look at the colored bar in your Audio Mixer when you talk.
- Green Area: This is too quiet. Viewers on phones won't hear you.
- Yellow Area: This is perfect. You want your normal speaking voice to live here.
- Red Area (The Danger Zone): This is where your audio "clips" and sounds like distorted static.
The Setup Trick:
- Do your "Hype Scream." Pretend you just won the game and get as loud as you normally would.
- Watch the bar. Did it hit the very top?
If yes, turn your microphone volume down (using the fader slider) until your scream just barely touches the red but doesn't hit the top.
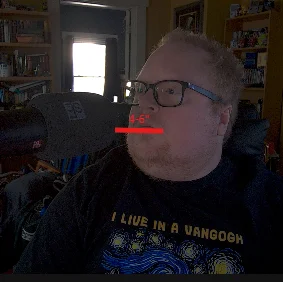
3. Proximity is Power
Because we aren't using fancy tools to artificially boost your volume, you have to help the microphone out.
- Keep the mic close. Ideally 4-6 inches from your mouth.
- Don't lean back. If you lean back in your chair to relax, you will suddenly get very quiet. Try to maintain a consistent distance from the mic while you play.
Your Homework
- Open Meld Studio and add the Magic Mic effect.
- Set the Strength to "Moderate" and enable Auto Gain.
- Type loudly on your keyboard while looking at the meter. It should stay silent.
- Do a "Sound Check" recording to make sure you sound crisp.
In Part 4, we are going to talk about the visuals—specifically, why you should Hide the Viewer Count and how to set up an overlay that doesn't look cluttered.
Part 4 - The Visuals
In Part 3, we fixed your audio using the "Magic Mic." You now sound like a pro. Now, we need to make sure you look like one.
When a new streamer sets up their scene for the first time, they have an urge to fill every empty pixel. They add a webcam border, a "Recent Follower" ticker, a "Donation Goal," a spinning logo, and a chat box that takes up 30% of the screen.
Don't do this.
This is what I call the "NASCAR Effect." You look like a racing car covered in sponsorship stickers. It’s distracting, and it covers up the game you are trying to show off.
Today, we are going to design your stream with one golden rule:
You are the content.

Rule #1: The Overlay Diet
Go look at your favorite top-tier streamer. Look at Shroud, or Asmongold, or any major creator. What does their overlay look like?
It is usually just a camera and the game. That’s it.
As a beginner, you don't need a "Donation Goal" bar because—let’s be honest—you probably aren't getting donations on Day 1. That empty bar just reminds viewers that nobody is donating.
The Perfect Starter Setup:
- Your Camera: Place it in a corner where it doesn't cover important game UI (like your health bar or mini-map).
- A Simple Border: A thin, static color frame around your camera helps separate you from the game background.
- Chat (Optional): If you are playing a slow game, on-screen chat is fine. If you are playing a fast FPS, skip it.
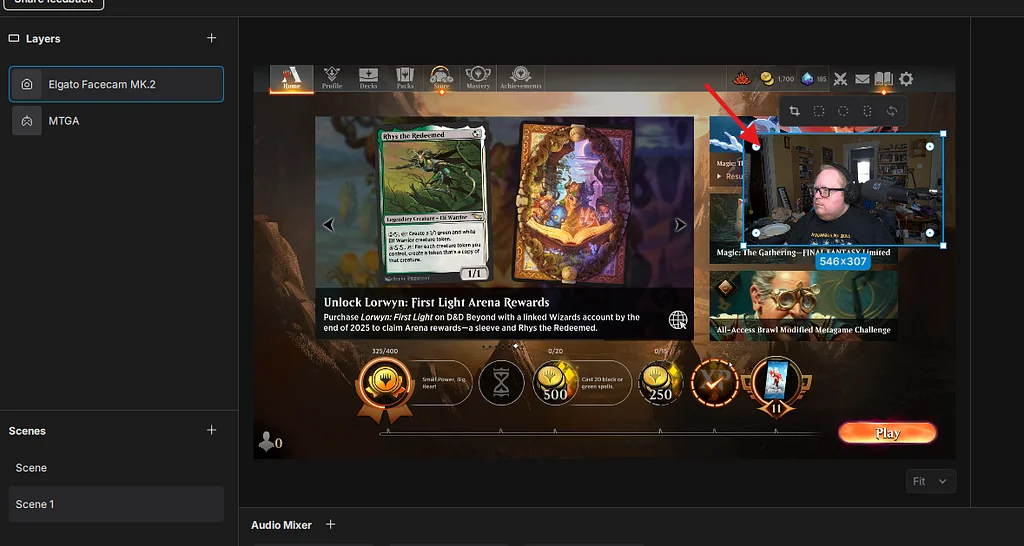
Rule #2: The Meld Advantage (Rounded Corners)
In the old days, if you wanted your webcam to have cool rounded corners, you had to use Photoshop to make a "Mask" file.
Meld Studio makes this incredibly easy, and it is the fastest way to make your stream look modern.
- Click your Camera Layer.
- Look at the settings panel on the right.
- Find "Corner Radius" and drag the slider up.
- You can go for a soft rounded look (20px) or a full circle.
Pro Tip: If you round your corners, you often don't even need a border. It looks clean and professional on its own.
Rule #3: Respect the Game UI
Nothing annoys a viewer more than wanting to see how much ammo you have left, but your face is covering the ammo counter.
The "Safe Zone" Check: Before you go live, launch the game you plan to play.
- Look at the corners. Where is the mini-map? Where is the health bar? Where is the inventory?
- Move your camera group to the corner that has the least important information.
- Meld Tip: You can create different "Scenes" for different games. Create a "Scene - FPS" with the camera on the left, and a "Scene - RPG" with the camera on the right.

Your Homework
- Audit your Overlay: Delete at least one thing from your screen today. If it isn't absolutely necessary, it goes in the trash.
- The Shape Test: Use the Meld "Corner Radius" slider to soften the edges of your camera.
- The Sticky Note: Physically cover the viewer count on your second monitor or click the "Hide" eye icon in your dashboard.
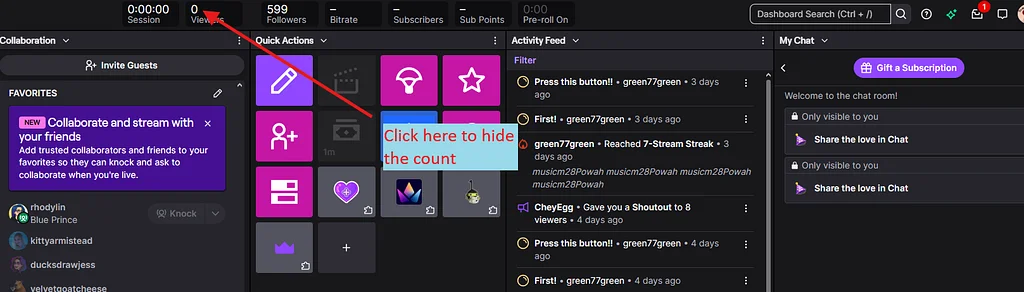
Rule #4: The Most Important Visual Setting (Hide the Count)
This is not a setting for your viewers. This is a setting for you.
I want you to go into your Stream Manager (on Twitch or Kick) and hide the "Viewer Count" number. Cover it with a sticky note if you have to.
Why? Because of the Psychology of Numbers:
- If you see "0 Viewers": You will get discouraged. Your energy will drop. You will stop talking. And when a new viewer does come in, they will see a silent, sad streamer and leave immediately.
- If you see "100 Viewers": You might get nervous, start stuttering, and lose your flow.
The Solution: Pretend you are streaming to a stadium of 10,000 people at all times. If you hide the number, you are free to perform. You will keep talking, keep making jokes, and keep the energy high. That energy is what turns a "0" into a "10."
Part 5: Going Live
We have built the car.
-
Part 1: You gathered your gear (and ignored the expensive stuff).
-
Part 2: You installed the engine (Meld Studio).
-
Part 3: You tuned the audio (Magic Mic & The Red Zone).
-
Part 4: You cleaned up the visuals (Rounded Corners & Less is More).
Now, you are staring at the button. "Start Streaming."
It is normal to feel nervous. But before you press that button, we need to fasten your safety belt.
The Safety Belt: Sery_Bot - Twitch Specific
The internet can be weird. Sometimes, trolls use "bots" to flood new streamers with fake follows or nasty messages. This is called a "Hate Raid."
Do not let this scare you. You just need a bouncer. We are going to install Sery_Bot. It is a free tool that instantly bans these bots before they even appear in your chat.
Twitch specific one-time setup (Do this now):
-
Go to your own Twitch chat and type:
/mod sery_bot -
In their chat, type:
!join -
Wait for the confirmation message.
That’s it. You now have a 24/7 security guard. If you ever get flooded by bots, Sery will catch them automatically.
The "Pre-Flight" Checklist
Do not just sit down and press the button. Follow this ritual 15 minutes before you go live.
1. The "Fresh Start" Reboot Computers get tired. If you have had Chrome open for 8 hours with 50 tabs, your PC is sluggish.
-
Action: Restart your computer completely. Open only Meld Studio, your game, and your music. Close everything else.
2. The 30-Second Record Test Never assume your audio is working.
-
Action: In Meld Studio, hit "Record" (not Stream). Talk for 30 seconds. Scream a little. Play the game for a moment.
-
Review: Stop the recording and watch it back. Is the game too loud? Is your mic muted? Did the Magic Mic cut out your fan noise? This 30-second test saves you from streaming for an hour with no audio.
3. The Water & Bio Check Once you are live, you want to stay in the seat for at least the first hour to build momentum.
-
Action: Use the bathroom now. Fill a large water bottle and put it on your desk.
4. The "Ghost" Notification Don't wait until you are live to tell people.
-
Action: Post on your Discord, Twitter, or Instagram 10 minutes before you start. "Going live in 10 minutes!" gives people time to actually get to their computers.
The First 5 Minutes: The "VOD" Rule
Here is the biggest mistake new streamers make: They hit "Start Streaming," and then they sit there silently for 5 minutes, waiting for the viewer count to go up.
Do not do this.
If someone watches your recording (VOD) later, they will see 5 minutes of a silent person staring at a monitor. They will click away instantly.
The Strategy: Start talking the second you hit the button. Assume there are 100 people watching, even if the count says 0.
-
0:00 - 0:30: "Hello everyone! Welcome back to the Neighborhood. Today we are playing [Game Name] and we are going to try to beat the final boss."
-
0:30 - 1:00: Start the game immediately.
You are performing for the Recording to use across social media, not just the live audience.
You Are Ready.
You have the tools. You have the knowledge. The only thing left to do is the one thing I can't do for you.
Press the button.
Good luck, have fun, and I’ll see you in the Neighborhood.
— Musicman (Your Friendly Neighborhood Bard)